Tag Archives: rhinestone

Candy Cane Wreath

Image


this is a fun lil project almost ANY age can do!

Image

Image

All you do is take about 24 candy canes (I think, maybe its 20) and then you tape them back to back, and lay them in a circle so theones that are back to back touch the next to make what looks like a heart…

Image


I cut out a snowflake and glued it to a circle piece of chipboard and used a hole punch to punch my bling from THe Buckle Boutique to accent the snowflake center. I added some bows with hot glue and used cardboard on the back side to help it all stay together for hanging

Image

Image

Image


Leave a comment

Filed under bling, rhinestone

Handmade Holiday Blog Hop – Zebra Door Wreath

Handmade Holidays 2014 Hop Logo

Welcome to the 4th Annual Handmade Holidays Blog Hop! A few years ago we were looking online for handmade gift ideas and thought it would be great if there was a resource dedicated JUST to handmade gift ideas. Enter the Handmade Holidays hop! We’ve gathered over 100 of our creative blogger friends in the craft industry as well as some of our fellow product manufacturers to bring you a plethora of inspiring gift ideas you can make now to give to your friends, family, and colleagues. Pin and bookmark these ideas for this holiday season and to use throughout the year! Each day of the hop features approximately 30 gift projects and you can “hop” from one blog to another to check them all out.

Who doesn’t love anything crochet?! I mean crochet has been around for ages and its STILL COOL! And getting cooler! Here’s proof!

wreath5

I was given the opportunity to work with Red Heart Yarn, my FAVE yarn company, so I set off to find something EPIC! And when I saw this I jumped up, grabbed my Red Heart Yarn stash and was eeeekking my way back to my seat with excitement! I LOVE Red Heart, their yarn is so affordable, soft, and they have SO much to offer in colors and types!

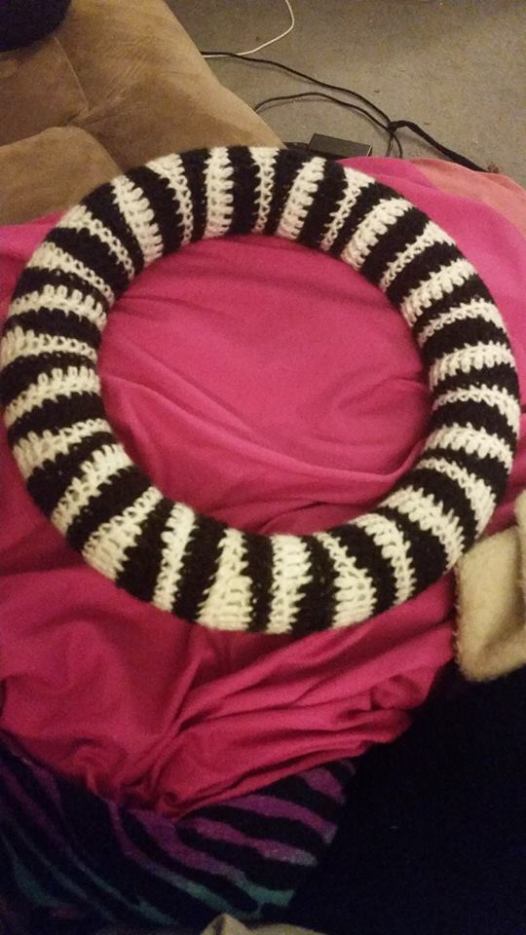
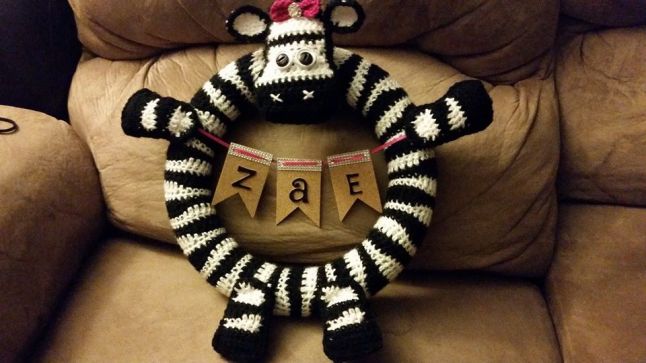
I came across this idea originally on pintrest, and waited ever so patiently for the pattern to come out, well the night before it was set to come out actually, I had just crafted something cool and was all pumped and on a craft high, so I thought, I can make up a zebra print, for sure! So off  I went!I practiced what I had come up with, gave it to my 9yr old to test, hers came out great so I knew i was in business with atleast the start of the wreath pattern and could jump right to it! Get a jump start on the wreath pattern I just HAD to make for my daughters room! That night I had the zebra swatch done! I was SO excited!

wreath1

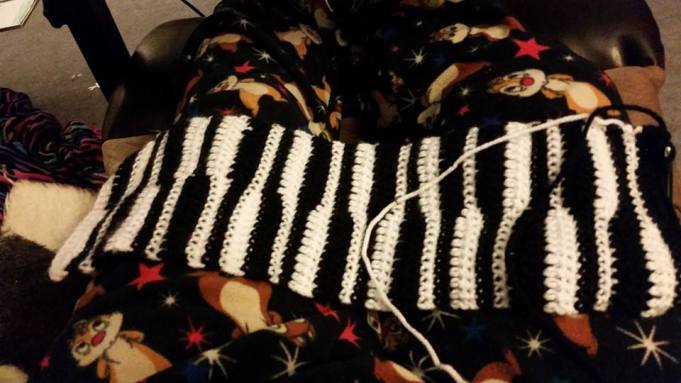
Now when I woke up in the morning her pattern was up so I went with what she had, cause I did NOT want to mess this up and I have only been crocheting for like 7 months… plus I was so nervous about wrapping the wreath frame, but like she said in her pattern, it came together fine even tho it seemed like it wouldn’t!

wreath2

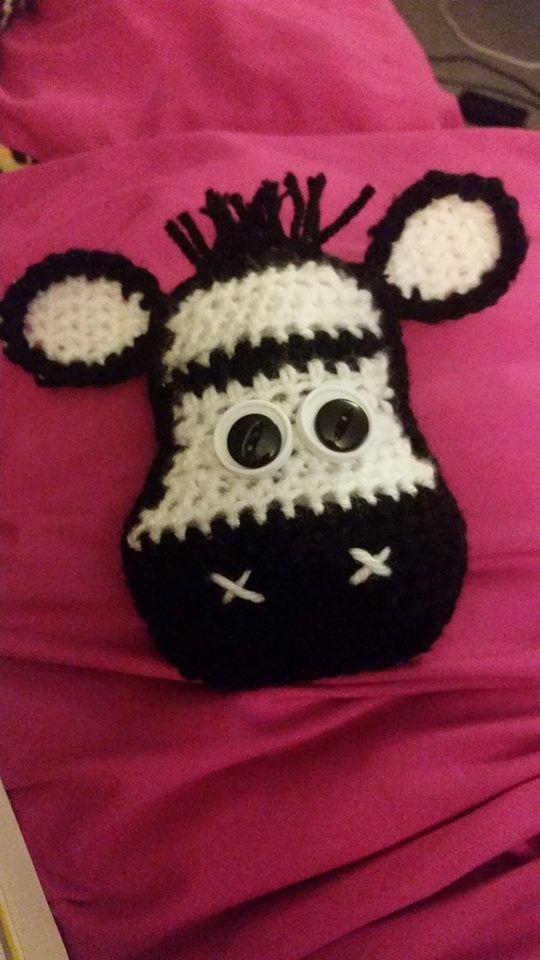
I just loved the lil head so much I had to snap a pic!

wreath3

I wanted to customize the wreath, so I used my Westcott scissors to cut thru some heavy chipboard paper, they just cut so great and easy and are the best fit scissors for my hands, I have fibromyalgya and they just fit great and feel great!

I also got the chance to work with some cork paper! OMG I LOVE THIS STUFF! I mean, its so easy to cut and looks great on EVERYTHING! Did you know you can stamp it?! I mean why am I not playing with that stuff right now, cause I’m writing this, but that’s the ONLY reason, for reals, go buy it, it rocks. Anyways, I used it on my lil pennants! I LOVE the look it gives! I used some rhinestone sticker sheets from The Buckle Boutique to add some sparkle to the pennants.   I poked two holes into the top of each pennant piece to feed some ribbon thru to hang the letter pennants, super easy, all these products are so easy to use…

wreath4

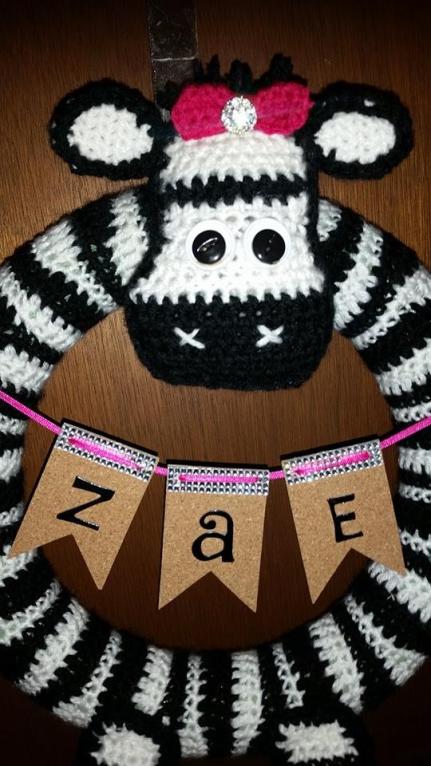
I had some thicker letters, but they didn’t want to stick to the cork very well since I’ve been hoarding them for about 2 years now, and given this was going to be on my kids door, I wanted to be SURE they would STAY on.. so I used a little adhesive to make sure they stayed in place. I also used it to attach the ribbon holding up the pennants to the under arm of the zebra, I used the Fabri Tac, and anybody who works with yarn knows its not an easy thing to glue to, but it worked like magic!

To bring this project all the way home I used a rhinestone slide from The Buckle Boutique on the bow to the zebras lil hair accessory!

wreath5

The pattern that inspired this was by Repeat Crafter Me, she is AWESOME, and can be seen HERE

Happy CRAFTING!

Are you ready for lots more creative handmade gift ideas and projects??

Follow along on our blog hop! Simply click on each of the links below to be taken to that post with additional information and photos on how to create a handmade gift project. Have fun and pin away!

Clearsnap

Westcott

Scrapbook Adhesives by 3L

Ellison Educational Equipment

ICE Resin

Neat and Tangled

Therm O Web

Walnut Hollow

Elizabeth Craft Designs

Rowland Technologies

Graphic 45

Hydrangea Hippo

Pink and Main

The Buckle Boutique

Tami Mayberry Art & Design – Tami Mayberry 

Jamie Dougherty – Jamie Dougherty Designs

Elizabeth Craft Designs – Raquel Mason

Meagan – The Charming Farmer

Scrapbook Adhesives by 3L – Angela Ploegman

Carolyn Dube – A Colorful Journey

Pink and Main – Mistyana Wright 

The Buckle Boutique – Niki Wilson

It’s Sew Lorine – Lorine Mason   ‎

Therm O Web – Andy Knowlton 

L. Grace Lauer – Uniquely Grace

Clearsnap – Meihsia Liu

Oh Snap Lizzie – Lizzie Sanchez

Graphic 45 – Katie Zoey Ho

Charity Wings

ICE Resin – Tatiana Allen

Polly Carlson – Pieces by Polly

Ellison Educational Equipment – Jan Hobbins

RoseRedd Paper Studio – Rochelle Washington


ENTER TO WIN PRIZES FROM OUR SPONSORS BY CLICKING ON THE LINK BELOW!

a Rafflecopter giveaway

Follow our Handmade Holidays Gift Ideas Pinterest board for even more inspiration!

CLICK HERE TO GO TO THE PINTEREST BOARD!


A huge thank you to our sponsors for this hop – please visit their blogs & websites below and follow them. And be sure to come back tomorrow for another 30+ amazing Handmade Gift Ideas!

Handmade Holidays 2014 Hop Logo SPONSORS 300dpi

Clearsnap || Ellison Educational Equipment || Walnut Hollow || Graphic45 || Westcott || ICE Resin || Therm O Web || Rowland Industries || Scrapbook Adhesives by 3L || Pink and Main || Elizabeth Craft Designs || The Buckle Boutique || Neat and Tangled

Additional Sponsorship provided to bloggers by:

Sakura || Fairfield Processing

17 Comments

Filed under bling, rhinestone

Girly Skull Poison Bottle Decor

Have I ever mentioned how much I LOVE decorating for Halloween?! And even more making my own Halloween decor?! I had this Jack Daniels bottle laying around for ever and I finally found the perfect project to do with it!

finishkdb20

I used an SVG cut file from Kadoodle Bug Designs called Girly Skull which you can get RIGHT HERE <— (click me, dont be shy!)

I also used my fave self adhesive bling sheets from The Buckle Boutique to add that extra sparkle to it! I used Beacon Adhesive to help me get everything to stick on!

Check out ALL THE SVGS at Kadoodle Bug Designs and FOLLOW the blog of The Buckle Boutique so you never miss a blinged out project!

Don’t forget to follow this blog! And tell your friends! I would love to see what YOUR making for Halloween Decor!!

~Niki

DT@ The Buckle Boutique

DT@ Kadoodle Bug Designs

Leave a comment

Filed under bling, rhinestone

OH The Places You’ll Go… ticket stub memory book

I don’t know about ya’ll, but I save every ticket stub to every movie, demolition derby, window tickets to our fave camping spot, wristbands to the fair, the emergency room visits…. all of it. Its a lil out of control, but I just have to. Its the scrapbooker in me! So I decided to buy this TINY lil binder! Mostly cause it was SO cute, I had no idea what I was doing with it when I bought it honestly, but anything mini you HAVE to buy.. am I right or is it just me?! Anyways… I bought it, it sat for a while, a few gift ideas came and went, I thought the person receiving this couldn’t POSSIBLY enjoy it’s tiny-ness more then me. SO I got a light bulb moment one day and made a lil place to teeny-tiny scrapbook these stubs and wristbands!!! I thought.. what better theme to do then a Dr. Suess OH THE PLACES YOU’LL GO theme! Well here’s the out come!

suess1 suess6suess3

I am MORE then pleased with it! I will share it with you again once I fill it up! which shouldn’t take me long since I seriously have a shoebox over flowing! I plan to journal a tiny bit ( I mean really thats all you can do with such a small cute binder!) about what we did, when, where, with who ect..

You can see I added the BLACK bling from The Buckle Boutique, and OMG I AM IN LOVE, I was if-y on it at first but it really brought this one home for me! I used it on the binding as well as front!

GO CHECK OUT THE BUCKLE BOUTIQUE! and follow their BLOG HERE! so you never miss a sale or a great project! We might just inspire you 🙂

Happy crafting!

1 Comment

Filed under bling

You Make My Heart SING… with bling :)

I love to scrapbook. Its my original craft love! Its where I really started crafting and playing with my creativity and then it quickly bloomed into an obsession! I now have a room, well more like half a basement dedicated to all things crafty! I just wanted to make a quick lil post to show that bling from The Buckle Boutique really is so amazing you can put it on ANYTHING!

h4


TOO CUTE, am I right?! I went with a simple, yet elegant color scheme and kept it simple, but just adding a tiny bit of self adhesive bling sheet scraps I had left over really brought this one full circle for me!

I also used my new fave adhesive on this layout from BEACON ADHESIVES, their scrapbook glue! It doesn’t wrinkle even the thinnest paper as it dries which is AMAZING and it dries fast and clear and doesnt get all over when your working with it! If you haven’t tried it, any of their glues, you need to cause I am now strictly using and buying their glues, all of the variations cause they ROCK! All of them work OUTSTANDING!

Anyways, I hope you enjoyed this lil scrapbook page! Be sure to check out Beacon Adhesives and The Buckle Boutique for all your blinging and gluing needs!

And never miss a project from THE BUCKLE BOUTIQUE DESIGN TEAM! FOLLOW THE BLOG HERE!!!

Happy scrapping, blinging and gluing!

~NIKI

Leave a comment

Filed under bling

DIY Side Lamp Decor using Illusion Film & BLING and paper.. oh yes it can be done!

When I received the Rolux Illusion Film I was soooo excited to play with it, and I’ll admit it, a lil intimidated! But I knew from the first moment I HAD to make a lamp out of this stuff!

well…here’s what I made!

lampy

I bought this SVG file of 3D onjects that had a lamp in it, but I think the site shut down cause I can no longer find it (if you find it, pleas elet me know cause I searced all over to see if I could find!)! I’ve had it about a year, but I’m SURE you can find an SVG cut out for a lamp similar to this!

I set it all up to cut on my Cameo, made sure my mat was plenty new and sticky and put it to the deepest blade setting and cut away at the pieces I needed made out of the film! It did have to be sort of popped out by hand but the blade did a good enough job that it was really simple to pop it out, and my blade is a year old! I decided to do just TWO of the sides in the film and the rest of the lamp is cardstock!

Once everything was cut out I used hot glue gun to glue the pieces together so the film would stick to the cardstock pieces and so it would go together pretty fast. I also cut out a layered flower and…. are you ready for the exciting part?!

I USED MY EMBOSSING HEAT GUN to heat up the layers one by one and watches it shrivel up and take shape! SO COOL! I was on top of the world with the results! It was so fast and easy and PERFECT to make this flower take on a 3D look and make it PERFECT for this project, and many others, you will see me use this time and time again in future blog posts! STAY TUNED! Anyways, I tinkered with ribbon and bling and a lil metal pendant I had with “You are my sunshine” engraved on it and once it looked perfect for what I was going for.. I just hot glued everything onto it and ran thru the house to show everybody what I had made! My daughters OOO’ed and AHHH’ed!

lampy2

Now keep in mind you will want to use a battery powered tea light with no actual flame on this lamp, for obvious safety reasons, but who wouldn’t love this?!

You totally NEED to check out the Rolux illusion film, the possibilities are ENDLESS! I can’t wait to show you what else I have in store for this stuff! I can’t wait to get my hands on more! And of course, you can’t forget the bling from The Buckle Boutique, no project is complete without it! Even the little bit I added to this, POW! Perfect!

lampy1

I might later add in a step by step to show you the heating of the film, even tho its literally that easy, just to show you how it reacts and how easy it really is! And to show you what else Im doing with the heat applied flowers made of the Rolux Film! I hope you enjoyed my little project! Follow the blog for more to come! I hope you come back! You should also check out The Buckle Boutique Blog HERE, and never miss a design team project, these ladies are AMAZING!

Happy CRAFTING! ~Niki the scrap princess

Leave a comment

Filed under bling, rhinestone

Craft Room Wall Art phase 1

We all see them… those blank letters at the craft store, and we pass by them thinking… I could do SO much with those, but then we wait, til the perfect idea, the perfect word, the perfect wall shows up. Well, I did that anyways. FINALLY I just picked some out. Like an omen, I was walking past them, and somebody had spelled out BUY ME with them, so I was like, surely this is a sign! (Or an excuse to finally buy them and make myself do something with them) I also got the GIANT wooden scissors to go on the wall with these, but I’m saving that project for phase 2 and a craft room make over organization wise. So HERE’S what I did with them using my favorite product EVER… BLING!

create

If you haven’t gotten yours from The Buckle Boutique… well what are you waiting for?! It’s amazing, life changing stuff I’m telling you!

I used various company’s paper, buttons, ribbons, jute string… you could do soo much with these, but the bling is pretty much a must!

I hope you enjoyed this simple lil bit of create-ivity! (see what I did there?!)

Stick around, follow the blog and check out my fellow design team, ladies over at The Buckle Boutique Blog <—– click here! to see even more GREAT ideas and projects and to never miss a sale! We might just inspire you!

~happy crafting!

Leave a comment

Filed under bling

Clothes Pin Centerpiece

I saw this lil project with a tuna can and clothes pins on pintrest and knew I had to do my own version of it using my favorite bling from The Buckle Boutique! I used this plastic container I had cause it was a bit bigger as I plan on putting a larger glass candle in the center. Here’s my interpretation of it!

center1 center4 center6

I used some jute twine stuff to wrap around, a lil ribbon and of course my new love BLACK bling sheet scraps from The Buckle Boutique!

All you do is clip the clothes pins around and decorate as desired! These would be a GREAT idea for a wedding centerpiece for tables, or a party of any sorts for that matter! Or even just decor for the house! Or to hold makeup brushes on your vanity!

I hope you like this simple project! Look it up on pintrest for other great add on’s and design ideas! And look up The Buckle Boutique on PINTREST for more great projects and sales, and their WEBSITE, and BLOG so you never miss a thing from my lovely fellow design team members!

As always, HAPPY CRAFTING!

Leave a comment

Filed under bling, rhinestone

A Little Birdie Told Me…

.. that The Buckle Boutique and DCWV go together like peas and carrots, like peanut butter and jelly, like feet and flip flops and summer time!!

I go to auctions ALOT with my family to find old treasures and to kill time, its always a good time too! Well one time I came across a huge box of birdhouses! Some were super cute, some were just terrible, but I vowed to make over every single one of them and make them into something pretty again! They were sturdy good made bird houses, I couldn’t let them get away or be tossed! So just assume I will be sharing many more bird houses in due time, lol.

back to my daughters room make over for her 10th bday in October, I know I talk about it alot, but its pretty much all I craft for these days! Which is loads of fun! And I’m making sure to have extra fun with it this time since I have a whole 5 year gap til the next group of two kids start getting up to that age! Paizley in 5 years, Azalea in 7 years. So I thought, a made over bird house to hang in the corner with some other hanging things we are working on would be amazing! Here’s what I came up with!

birdhouse


I used the super cool corrugated paper in teal from DCWV, I love working with their products so much I used their self adhesive cork paper for the body of the house in polka dotted teal! And no project is complete without self adhesive bling sheets from The Buckle Boutique!

I used stamps and regular old black ink pad on the cork and I LOVE how it turned out, I will be stamping much more DCWV cork paper!!! I free handed some swirls on the cork with a black journaling marker, which I also LOVE how it came out so I will also be coloring, journaling and doodling on DCWV cork as well in the future!!!

If you haven’t played with the DCWV cork paper, you need to! It comes in many colors and designs and is SELF ADHESIVE! Which made this project sooooo fast and easy! And the cork cuts soooo simply with scissors or x-acto knife too!

Go check out The Buckle Boutique for all you bling needs! Follow the BLOG to never miss a project or a SALE!!!! And GO GET YOUR CORK PAPER!!! You will be entertained for the whole stack!!! Its AMAZING!

As always, HAPPY CRAFTING! Show me your birdhouse make over and stay tuned for more of mine!!!

Leave a comment

Filed under bling, rhinestone

The Lil Old Rain Boot I Can’t Remember How I Ended Up With…

I’ve had this adorable lil boot planter for ages, its run down, stained and just a lil blah, but with a  lil bling, it has a new look, while still being its original cute self at the same time.. Just goes to show, it doesn’t always have to be something new! You can bling an old fave and give it a lil shine to bring it back to life!

boot3boot4


What old loved treasure would you give a lil bling to, to give it a whole new life?!

I love the products from The Buckle Boutique that make things like this possible! GO check em out!

Happy Crafting!


Leave a comment

Filed under bling, rhinestone